SHE's Crafty: Photo Frame

Sunday, October 16, 2011


I really love the idea of this week's DIY project. It's a way to display many of your photos at the same time! It's also great for your event and then to use at home when you're finished! This week's DIY project is this great homemade frame with clothespins.

MATERIALS NEEDED:

  1. Hook Screws
  2. Twine
  3. Measuring Tape
  4. Pencil
  5. Scissors
  6. Clothes pins
  7. Frame- You can either buy a frame somewhere that doesn't have glass, or you can make one. If you'd like to make the frame yourself the materials you'll need are:
  • 4 Pieces of Wood
  • 4 Screws
  • Pencil
  • Measuring Tape
  • Circular Saw
  • Power Drill

(A husband or friend that is good with a circular saw is definitely a bonus for this project as well!)

DIRECTIONS:


FOR THE FRAME:

  1. Decide how big you want the overall frame to be. Measure and mark two pieces of wood with the same size, and do the same with the other two.
  2. Use the circular saw with a miter box to cut 45° angles in the wood pieces in a way that they will fit together to form the frame.
  3. Put two corners together and use a 1/16” drill bit to drill a guide hole through both pieces of wood. Then screw in one screw to hold the pieces together.
  4. Repeat step 3 until all corners are connected.

AFTER THE FRAME IS BUILT, OR IF YOU BOUGHT A FRAME:

1. Decide how many rows of photos you'd like to put on your frame. Use the measuring tape to measure evenly where the screws will hold the rows of twine.

2. Screw in the hook screws evenly.

3. Take twine and cut strips long enough to go across the frame. Slip one side of the twine through a hook on the left side of the frame and tie tightly. Then pull tight across the frame and tie the other side of the twine to the hook screw on the right side. Once both sides are tied, you can turn the hook screws in to tighten the twine if necessary.

4. Repeat step 3 until all rows of twine are installed.

5. Gather your favorite photos and hang them from the frame with the clothespins to display at your event!


I actually took pictures while doing measurements and placing the hook screws, but didn't have my memory card in my camera at the time, so I only have finished pictures. Hopefully the instructions were easy enough to follow without photos.


I loved the finished product of my photo frame and can't wait to use it at my best friend's engagement party coming up in a couple of weeks. It will be great to display in my house after the fact, too. It's nice to have these projects that can be used once your wedding is over, too. Enjoy! Let me know if you have any questions at erin@stellaharperevents.com.

SHE's Crafty: Cornucopia

Wednesday, October 12, 2011


The Latin meaning for cornucopia is  the "horn of plenty" and is most often seen around Thanksgiving time. Greek mythology tells the story of the cornucopia; it was a magical goat's horn and whenever the owner requested food and drink the horn filled itself with whatever was asked. It's a great decoration for the fall festivities and would also be a unique decoration for a place card table at a wedding. This symbol of abundance and nourishment can be filled with gourds and pumpkins like mine or pears and nuts, whatever you would like.
To create the cornucopia you need burlap, a wicker cornucopia, hemp or twine, and raffia. You can find all these materials as a craft store (at least during Thanksgiving time). 
Take the burlap and wrap the cornucopia in it. It doesn't have to be perfect or look awesome because the whole outside will be covered. So if you try to make anything look good make the inside look good. Use a hot glue gun to glue the burlap to the cornucopia - just be careful because it's super easy to burn yourself (burlap has holes- ouch!!). 
Next take the hemp and tie a knot at the end of the raffia and wrap it around and tie the hemp in another knot at the end of the raffia. Wrap the hemp/raffia that you created around the cornucopia, use a hot glue gun to keep it in place. Continue this process until the whole cornucopia is wrapped with raffia.
Now it' time to fill it up!  Add whatever goodies you'd like to your new cornucopia!


See you next week for another holiday blog!
~ Melissa

Style Watch: Old Hollywood Glamour

Sunday, October 9, 2011


The style theme for this week is going to be Old Hollywood Glamour.  The inspiration for this week’s theme is a great childhood friend of mine’s wedding, coming up in June next year.  She is getting married at a classic old theatre that is so beautiful!  Her color scheme is red and black, which I think is perfect for Old Hollywood.  When you have such a strong theme like this, there are so many fun things you can do!

As always, I stay true to my thought that invitations are the first thing that set the tone for your wedding, I think there are a few great ideas that will set the tone for this theme!  This first one I love because it just feels like 1920’s movie premiere.  The other idea comes from my bride friend, Laura, who will be using a ticket for her invitation!  Such a great idea!


Once you’re at the wedding, the theme can be carried out in so many ways.  The first thing that the guests would see would be the theatre marquee!  If you’re doing an Old Hollywood/Theatre theme but are not having the wedding at a theatre, I would definitely make something that looks like this. 

For flowers, I would stick with basic traditional flowers- red roses, white lilies/orchids.  If you do black bridesmaid dresses, red flowers would be a great pop of color. If you do red bridesmaid dresses, you could do white or a mixture of red and white.  
For the bridal look, I think the trend of the birdcage veil would be perfect at this wedding. The one below even has a feather which is perfect for this theme!


For centerpieces, it’s a good idea to have a little bit of a mixture.  Some just flowers-some should be tall and some should be short- and also some other special touches.  I think a great and fun way to incorporate the theme here would be to add feathers! 
I think that for the other centerpieces you could find some old vintage cameras and place them in the middle.  You could probably find some of these at thrift stores or antique stores.   I also love doing small candles with lace covering them.  Check out my past DIY blog to see how to make these.

Because this theme is so fun, I think the reception needs to have some fun things for the guests!  My first idea is a popcorn machine!  I think this fits perfectly into the theme, and is fun for your guests.  You can find these paper popcorn containers for pretty inexpensively, too.
My other fun idea is with the guestbook.  I think a Polaroid guestbook kind of gives off the old feel and gives the guests something fun to do!  All you need is a Polaroid camera or two, a blank scrapbook, blank Polaroid film, and some pens and tape.

The last touch for this theme is to have a great, bold, wedding cake.  I found this black and white cake that I love.  The stitch detail looks sort of like fishnet stockings which definitely reminds me of Old Hollywood. You could add red accents to the cake table, or with some sort of topper or flowers around it.

Overall, I LOVE this theme, and I love the many different things you can do with such a fun theme.  Hopefully it sparked some ideas with some of you!

See you back next Monday for another DIY project.
Invitation that IS a ticket stub


Pumpkin Cookies with Cream Cheese Icing

Wednesday, October 5, 2011

For the next three months, each Wednesday, Melissa, our Guest Blogger and member of the SHE team, will be blogging about something festive. We will use the holidays that fall within each month to guide the blog.  Many, if not all of the festive blogs will be easily worked into any wedding or party, but mostly we wanted to provide a general holiday blog that we felt like all of our clients, family and friends would enjoy!  Let us know what you think by becoming a blog follower!

It's October! Let the Pumpkin obsession begin, and everything else that is "Fall."

I found this awesome recipe for pumpkin cookies with cream cheese icing that I had to share! So let this "DIY" project give your holiday season a sweet start.


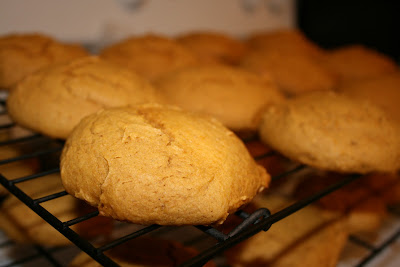
Oh ya, the picture got your attention didn't it... can you smell the pumpkin yet?

Pumpkin Cookie Ingredients:

1 Cup Shortening
3 Cups Sugar
2 Eggs
1 Large Can of Pumpkin Pie Mix
1 tsp. Vanilla Extract
5 Cups Flour
2 tsp. Cinnamon
2 tsp. Nutmeg
2 tsp. Baking Soda
2 tsp. Baking Powder
1 tsp. Salt

I have a kitchenaid- if you don't have one, don't worry, use a handmixer... if you can afford one they are awesome!! 

This recipe makes about 4 dozen cookies... I was eating and making, so I loose track! But definitely enough to share!


Measure out 1 cup of shortening and 3 cups of sugar and put them in your bowl...
this is not an advertisement for Crisco or Publix :) so whatever kind of shortening or whatever brand of sugar is just fine!

Mix it up!
Next add two eggs and mix it up again!
Into the mixer they go!
Don't taste it... we're not to the "finger licking" step yet... Add the Pumpkin Pie (in a can) Mix!
Not an ad for Libby's :) Any large Pumpkin Pie Mix will work! Pour that stuff in and mix it up!
Add 1 tsp. of vanilla extract. I bought store brand, mostly because that was all Kroger had to offer... still tasted great!
SNOW STORM in the kitchen! It's time to add 5 cups of flour! This is when I put on the KitchenAid mixing cover thing to keep the flour in the bowl. If you don't have one of those just be more careful when mixing in the flour to avoid a white kitchen (It's not Christmas yet!)
My measuring cup only shows 2 cups, don't let that fool you! It's 5 cups of flour!
Almost finger licking time... first add the spices!


Add 1 tsp. of Salt, 2 tsp. of Baking Powder, 2 tsp. of Baking Soda, 2 tsp. of Cinnamon, and 2 tsp. of Nutmeg... Mix it good... Mix it Real Good! Should taste really good now! Lick those fingers! And wash them... :) Next plop them onto a cookie sheet! 


Put the cookies into an oven that is 350 degrees! Leave them in the oven for about 12 minutes.
Mmmmh... pumpkin smell...

Take them out, if they look almost "wet" they are not done... If your unsure, pull one apart and see if it looks like batter or like cookie :) Then put them on a cookie rack or if you cut up a brown paper bag that works or you could use wax paper! Whatever you would like. 
 
Let them cool for a little while... and once they are cool you'll add the cream cheese icing. Oh that's right, let's make the cream cheese icing now! You can make the icing first if you want! Just don't let the icing sit out all day, it's made of cream cheese, so it needs to be refrigerated!


Cream Cheese Icing Ingreidents:
2 packages of cream cheese (8oz)
1/2 cup of butter (softened)
2 Cups of Sifted Confectioners' Sugar
1 tsp of Vanilla Extract

I used the Philadelphia cream cheese... but again, any cream cheese should work.

Softened butter. Ok so this is more like melted butter, but my husband and I haven't gotten around to getting a microwave and well frankly we've gotten used to not having it (I know we're crazy) so mine is more melted becasue I had to "soften" them on the stove. If you accidently melt them, don't worry, but they just have to be soft!


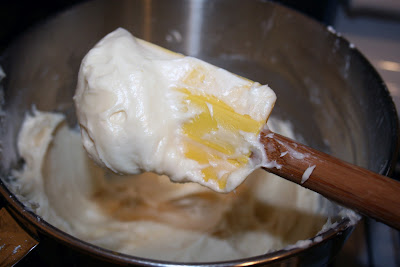
Put the 2 pacakges of cream cheese in the mixer, and the stick of (1/2 cup) butter and mix them together! Then add 2 cups of sifted confectioner's sugar (AKA powdered sugar). Mix it up! Add a tsp. of Vanilla Extract and mix until even!


This is what it will look like! Creamy goodness! Make sure you scrape the sides of the bowl so that everything mixes evenly.

Now that's some tasty icing...

Ice those cookies! Sprinkle a little bit of cinnamon on top or nutmeg works too if you prefer that flavor!

Share the delicious pumpkin treat!


If you make these let me know what you think! I really think you'd be amazed just how delicious they taste!

Related Posts Plugin for WordPress, Blogger...